Garden Burgers and Springtime

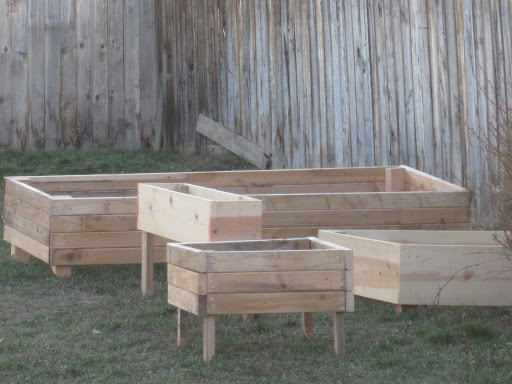
Spring is one of my favorite times of year.  The seeds are sprouting.  Progress has been made on our raised bed garden.  Gilbert is running around outside like a little nutter.  This weekend I got to hang out with all three of my lovely sisters and my niece and nephew. 

But telling you all about that stuff will have to wait, because today is about garden burgers.

I love burgers, but I probably should not eat them as often as I do.  So for the sake of my figure, I have accepted that sometimes a veggie/garden burger needs to be substituted.

If I’m going to miss out on red meat, the substitute better be darn good.  In this case, I think it is.

White Bean Burger

You will need:
2 cups dry white beans
1 large onion
2 carrots
2 celery stalks
1/2 cup mushrooms
1 cup corn (frozen)
2-3 tablespoons coconut oil (or frying oil of choice)
Salt/Pepper to taste

Makes 8-10 patties. 

Preparation: The night before, start the beans soaking.  If you forget, you can add water and beans, bring the beans to a boil for a few minutes, and then turn them off and let them sit for an hour before you start the burgers.  I have found that it does not make a difference either way.
Before you begin prepping the other ingredients, turn the beans on and bring them to a boil.  Make sure that there is plenty of water.  Let them simmer while you are working on the other ingredients (probably about 20 minutes).  You want the beans to be soft and edible.
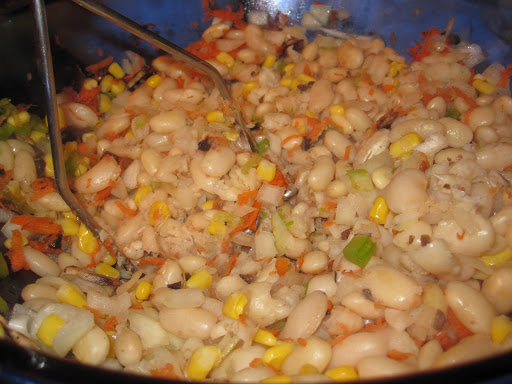
I love colorful ingredients!

Step 1:  This is the step with all the chopping.  Dice up the onion.  Grate the carrots and celery using the medium size option on a standard grater.  After you are done grating, “wring out” the carrots and celery.  Take one handful of carrots/celery at a time and give them a good squeeze over the sink.

Combine carrots, onion, and celery in a large mixing bowl and set aside.

Step 2: Precook the sliced mushrooms and then dice them up finely.  Pat them dry and add them to the bowl with the carrots onion and celery.

Note:  The trick with garden burgers is to avoid extra moisture that will prevent the patties from holding together and at the same time have enough moisture to hold the patty together.  You can add breadcrumbs to help soak up the extra moisture.  Personally, I don’t like the texture that results from adding bread crumbs.  I have noted the steps I take to eliminate the extra moisture.  If you want to skip those and add bread crumbs instead, feel free.

Step 3: Verify that the beans are fully cooked.  Then drain the beans and add them to the mixing bowl.  The beans with the other vegetables until they form a paste that can hold up in patty form.  Salt and pepper to taste. 

I start with a masher, but find that smooshing the ingredients together with my hands works better.

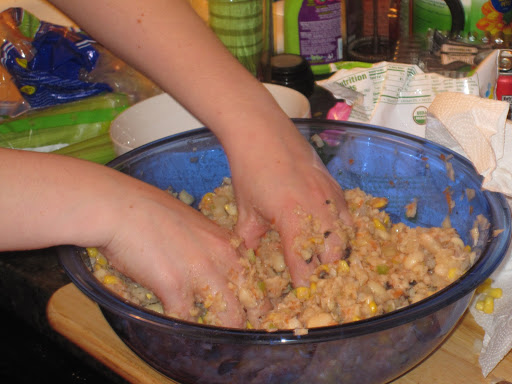
Step 4: Melt a tablespoon of the coconut oil (or frying oil of choice) in a skillet on medium heat.  Roll the bean mixture into balls and press into a patty.  The size of the patty depends on the size of the buns. 

There is a joke in that statement somewhere…

Step 5: Place patties into the frying pan.  Fry until brown on each side and heated all the way through.

They should look like this:

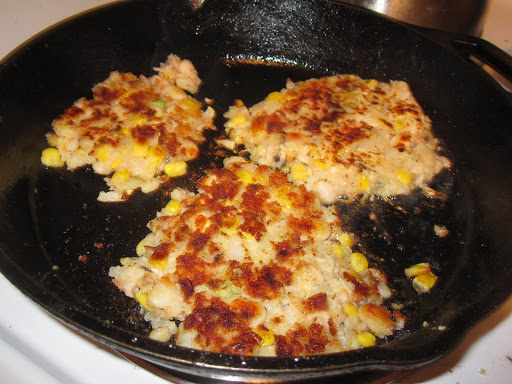
Repeat frying as many patties as you need.

We put ours on toasted onion buns from a local bakery with mixed green and red onion, drizzled with homemade honey mustard.  

My photography does not do it justice.  It was beautiful and delicious.

I also added a slice of cheddar cheese from Greenbank Farm.  Their cheese is just about the best thing ever. 

You can add almost any variation of spices to this recipe to give it a twist.  Add mexican spices and make it a “fiesta burger”.  Or add some Tabasco and cajun seasoning to make it a “kickin’ cajun burger”.   If you don’t have white beans, I have heard chick peas will work as well.

A batch of these burgers makes more than we can eat in one dinner, so I am able to freeze the remaining (uncooked) patties and have a quick meal on hand for the future.

They really are amazing… almost as amazing as a thick, juicy patty of beef… but not quite.

To homestead or not to homestead…

Lately, I have been thinking about how Abe and I want to live and how we want Gilbert to grow up. I read a few blogs of bona fide homesteaders like The Elliot Homestead and Black Fox Homestead.
I garden and preserve my own food. I compost. I buy organic when it’s actually worth it. I started buying my eggs from a local farmer.  I try to buy local produce. I’m working on being more frugal and eating healthy (by the way, my pre-pregnancy jeans started zipping again last week). A bit further into the spring, I’m planning on getting laying hens.
But am I a homesteader? Should I declare myself a homesteader and join the movement?
To me, homesteading evokes images like this:

(source)

 I find myself humming tunes from mid-century Rogers & Hammerstein musicals.

So why don’t I just get over myself and admit it that I’m an aspiring homesteader?

(Abe said that he is on board as long as it involves growing horseradish.  What can I say?  The man is not hard to please.)

I have never been a joiner. To quote Groucho Marx, “I don’t want to belong to any club that would accept me as a member”. I am cautious when declaring myself to part of a group. I research and research. Then I research some more. If I find that I agree with a group’s ideas about 80% of the time, but the other 20% really bugs me, I pass. I still haven’t picked a political party…
According to my research (I must admit my research mostly involves Google… my inner librarian is crying a little), the modern homesteading movement comes down to valuing self-sufficiency and minimizing waste. The homesteaders value living simply and closer to the land. I have found that the motivations for homesteading are diverse. The reasons range from a desire for something simpler, to a love of fresh food; from a need to be healthier, to a desire to be less dependent on big ag and/or the government, and a desire to be good stewards of the land. The homesteaders are big families and small families. They live in cities and on farms. The degree to which they homestead varies.
With this in mind, I think it is safe to say… I am an aspiring homesteader!!!
I want to live closer to the land. I love fresh food and home-preserved goods. I strive to live simply. I want to pass on a well-preserved planet to my kids.
Now that it’s out, I feel better. 

Mmmm… Quiche

Despite my best efforts, I inevitably have things in the fridge that are about to spoil.

The half an onion chopped up from something I cooked last week…

A few pieces of bacon that I had the noble intention of getting up early to cook before work…

The big container of sour cream that I got at the grocery store because I thought “I only really need a half cup for that meal I’m planning to make, but the larger tub is a better deal… I’ll surely find a way to use it up.”  Then I find myself at some point in the future saying “crap… the expiration date is tomorrow”.

The small container of cooked veggies from dinner two nights ago…

You get the point.

Sometimes I just need to use up the odds and ends.  When this happens, my go-to meal is quiche.

It’s simple and forgiving.  With a little heating and some eggs, the odd ball things in the fridge can become something delicious.

The most time consuming part of the process is normally the pie crust.  Thanks to a super easy press in pie crust (recipe adapted from Cooks.com), I don’t have to worry about rolling out the dough.

You will need:

1 1/2 c. sifted flour
1 tbsp. sugar
1 tsp. salt
1/2 c. vegetable oil
2 tbsp. cold milk

Preheat the oven to 400.

Mix the dry ingredients directly in the pie pan:


Add the wet ingredients and mix with a fork until it’s nice and crumbly.  Then press evenly throughout the pan.  (It does not have to be even).

Voila…

Bake for 5 minutes in the oven.  Remove and set aside.

Now for the quiche part.  I would love to give a recipe, but because it is made up of the leftover stuff in the fridge, there is not one.

In this case, it involved an old onion, half a red bell pepper that was about to go bad, some extra mushrooms, four pieces of bacon that had been around for awhile.  I chopped them up and cooked them:

Add some shredded cheese (in this case raw edamtaler cheese, cheddar, a dollop of sour cream, a couple table spoons of softened cream cheese).

I then dumped in 6 eggs mixed with about a half cup of milk.   Popped it in the oven for 40 minutes (pulling it out and brushing the crust with water midway through).

I love that the slightly questionable stuff in the fridge became this:

My only regret is that I could not just take a fork and eat it directly from the pan.

Some nonsense about manners… personally I think they are overrated.  Okay, that is not true… but I wish it were.  Sigh.

Carb Heaven…

Oh man.  Today I found a new happy place.

A proper bakery.  They have a wall full of many different kinds of bread and a display case full of pastries, pies, donuts, and cookies. 

And no espresso… just plain old (but good) drip coffee… for less than a dollar.  Just my style. 

Don’t get me wrong, I love lattes and mochas, but I find that bakeries sometimes add espresso machines and forget to focus on the baked goods.

For $9, I picked up all the carbs I could want…

I got a loaf of oatmeal wheat bread, sourdough bread, english muffin bread, and onion buns.

Plus, I got to watch Gilbert try a fresh donut.

My fellas are so handsome.

He thought that was pretty great.

I have been thinking about trying to make my own bread on a regular basis, but (as you will find is a problem for me) I lack the time to do it.

So, until there are more hours in the day or I get super organized and carve out time to bake bread, I have found a source of freshly baked bread.  And cheap coffee.

It’s Friday!!!

Happy Friday, friends!  It’s time for a relaxing weekend of gardening and playtime.  
Abe and I are going to work on our raised beds.
This is all we have so far, but aren’t they pretty?

Please note that by “Abe and I”, I mean Abe will do the heavy lifting and I will cuddle Gilbert and provide “instruction.”  I’m helpful.

Or, alternatively, Gilbert will decide that exploring the backyard is way cooler than cuddling with good old mom and go looking for mischief… 

Or he might just pick some grass…

It could go either way.  I’m pretty sure I’m going to have the kid who picks flowers in the outfield when he is supposed to be playing baseball.  I’m okay with that.

Have a wonderful weekend!

Steel Cut Oats

Last year, my husband introduced me to steel cut oats. (If you are as ignorant as I was as to what steel cut oats are, wikipedia can fill you in.)

There is some debate about whether steel cut oats are better for you than rolled oats (not the quick-cooking kind… rolled and steel cut are better than instant). Most people seem to agree, steel cut will keep you feeling fuller for a longer time than rolled, because they take longer to digest.  Here’s a quick visual so you can see the difference:
  

(source)
I would love to say I eat oats because they are healthy and sound awesome and health conscious like that.  But that would be a lie.

I just eat them because they are tasty.   Plus Abe will make them for me, which is awesome since I start work every morning at 6am.

Here is the overnight recipe that Abe uses.  
You will need:
2 tablespoons of butter
2 cups of steel-cut oats
6 cups of water
Toppings of choice (I use buttermilk, cinnamon, and brown sugar)
Melt the butter in a pan on medium heat (difficult start right?)
Add the oats and toast for 5-10 minutes.  Stir frequently to avoid burning the oats.  
Add the 6 cups of water and bring to a rolling boil and boil 2-5 minutes.  Adding a 1/2 cup to 1 cup more water makes the oats turn out creamier.
Put on lid and turn off the burner.  Leave on the stove overnight.
In the morning, all you have to do is heat them up.
Add a splash of buttermilk, a dash of cinnamon, and a spoonful of brown sugar (or drizzle a little maple syrup).  Abe likes to add raisins or dried cranberries.  Doesn’t it look good?
  It’s delicious!  Gilbert says you should try it…
He is bossy like that.  
I apologize.
Wait… no I don’t… oats are good for you.  Gilbert is only thinking of your health… and buttermilk.
 Don’t resist.  Try it.

A useful tip for the kitchen

Did you know that you can regrow green onions?  
It’s awesome.
You can just chop off the tops of the onions when you need some, stick them in a glass of water, set them in a window sill, and watch them regrow.    
Voila…
(the batch in my kitchen window sill)
 I topped off my poor man’s chicken cordon bleu with some of these this evening.
Because garnishes are classy.

Shrimp Stuffed Avocados and Laziness.

I like simple recipes. 

On rare occasions, I will feel ambitious.  I will attempt one of those recipes that contain 100 ingredients.  It will take 3 hours of prep time and taste incredible.  Then I will never make it again, because I don’t have the time.

I have a husband I want to spend time with…  and a baby to cuddle… and a full time job… and now a blog.

I want something that requires minimal prep time, has few ingredients, and tastes great.

Yesterday shrimp stuffed avocados fit the bill.

Now I’m sharing it with you, so you can share in my lazy cooking habits.  You’re welcome.

Here you go:

Shrimp Stuffed Avocados

You will need:
1/2 lb small or medium shrimp
2 large avocados
1/2 head of lettuce or greens of choice (I used iceberg)
1/2 cup cocktail sauce

Step One: Dice up your lettuce and divide equally between two bowls.

Step Two: Then cut the avocados in half and place on the lettuce. 

Step Three: Divide the shrimp equally, filling the avocados and spilling out into the bowl.

Step Four: Add a spoonful of the cocktail sauce to the top of each shrimp filled avocado.

Step Five: You’re done.  Grab a spoon and eat up.

(forgive my lack of photography skills)

I think I’m going to make this next time I have leftover pico de gallo.  Maybe mix the pico in with the shrimp and put a splash of hot sauce on it.

Well… time to go do productive things.  Like paying bills… and cleaning… blogging is so much more fun than that.

Craigslist Eggs

Today I bought two dozen eggs off of Craigslist… seems legit, right?

I have friends who have had success with finding quality goods for a fraction of the supermarket price by going online and finding farmers who will sell directly to them.

Needless to say that I was skeptical.  Going on Craigslist to find food?  It just seems… well… sketchy.

Last week, I spent almost $5 for a dozen pastured eggs at the natural food market in Wenatchee.  Why pay that much?  I like my yokes to be orange, not sad and yellow.

See the difference?

(source)

Spending that much for a dozen pastured eggs gave me the motivation I needed to get our eggs from an alternate source.  I went online, searched “eggs” on my local craigslist, and found a few options.

I finally decided on one, gave them a call, and went out to pick up the eggs.  I was surprised and excited when the farmer took Abe and I around to visit his seven lovely hens and handed us these beauties:

 $5 for two dozen large, farm fresh eggs.  Double the eggs at half the price.  I’m planning to go back in a few weeks for more…

This leaves me wondering what else I can find from alternate sources? 

I think this may have started a new obsession.